Updated April 2026
Overview
This post walks you through the key elements that make up the Business Central user interface. It covers navigation, page types, role centres, and personalisation. It does not cover licencing or system configuration.
What Is Dynamics 365 Business Central User Interface?
The Business Central user interface is the visual layer you interact with every time you log in. It organises your work into pages, menus, and dashboards, and connects you to the data and tools you need day to day.
The layout is consistent across the system. Once you learn how one area works, you can apply that knowledge everywhere else. You can also personalise your view so the most relevant information sits front and centre.

Benefits of Dynamics 365 Business Central’s User Interface
The user interface in Dynamics 365 Business Central offers several benefits that enhance the overall user experience and productivity.
Here are a few key advantages:
1. User-Friendly and Intuitive: Dynamics 365 Business Central’s user-friendly navigation makes navigating its various modules and features a breeze. The interface provides intuitive menus, ribbons, and search functionalities that enable users to find what they need quickly. With just a few clicks or keystrokes, users can effortlessly move between different areas of the system, ensuring a smooth and efficient workflow.
2. Clean and Organised Layout: Dynamics 365 Business Central’s user interface greets users with a clean and organised layout, ensuring a clutter-free workspace. The design focuses on simplicity, allowing users to easily locate and access the information they need. Clear labels, icons, and intuitive placement of elements create a visually appealing and user-friendly environment.
3. Customisable Pages: Dynamics 365 Business Central allows users to customise their dashboards and pages, tailoring them to their specific needs and preferences. This allows users to quickly access the most relevant information and functions, further enhancing productivity.
4. Streamlined Processes: The user interface in Dynamics 365 Business Central acts as a centralised platform that brings together different aspects of a business, including finance, sales, inventory, and more. This integration allows for seamless communication and collaboration between departments, eliminating the need for duplicate data entry and reducing the risk of errors. With all the necessary information readily available in one place, employees can easily access and update data, track progress, and make informed decisions. This streamlined approach improves efficiency and enhances productivity by eliminating redundant tasks and optimising workflows. The user-friendly interface simplifies the management of various processes, making Dynamics 365 Business Central a valuable tool for businesses of all sizes.
Overall, Dynamics 365 Business Central’s user interface offers a range of benefits that make it easier for users to navigate, access information, and perform tasks. It ultimately helps businesses optimise their operations and make informed decisions.
The App Bar
The app bar runs along the top of every Business Central page. It gives you quick access to Microsoft 365 apps and services without leaving Business Central.
From the app bar, you can check your email, create documents, and open files from OneDrive. You can also switch between modules, view notifications, and find help resources.
To personalise the app bar, select Settings, then View All under the Microsoft 365 section. From there, choose your preferred theme and adjust which apps appear.


You can personalise the app bar by selecting SETTINGS and VIEW ALL under the Microsoft 365 section, where you can select your preferred theme.
My Settings
The My Settings page controls your personal configuration in Business Central. Changes you make here only affect your account. They do not change anything for other users.
On this page, you can update the following:
- Role Centre
- Company
- Work Date
- Region
- Language
- Time Zone
- Notifications
- Cloud Storage
If you work across multiple companies or need to adjust your region settings, My Settings is where you make those changes.

Role Centre
Role Centres are personalised dashboards tailored to your job function. Business Central assigns you a Role Centre based on your user role. A finance manager sees different information and shortcuts than a warehouse operative.
Each Role Centre is divided into two main areas: a navigation and actions area at the top, and a content area below.
The navigation area gives you access to the entity lists most relevant to your role. A business manager might see Finance, Sales, and Purchasing as top-level navigation items, running left to right in order of importance.
The content area shows activity panels, KPIs, and shortcuts to tasks you carry out regularly. Because the Role Centre focuses on what you actually do, you spend less time searching and more time working.

Explorer
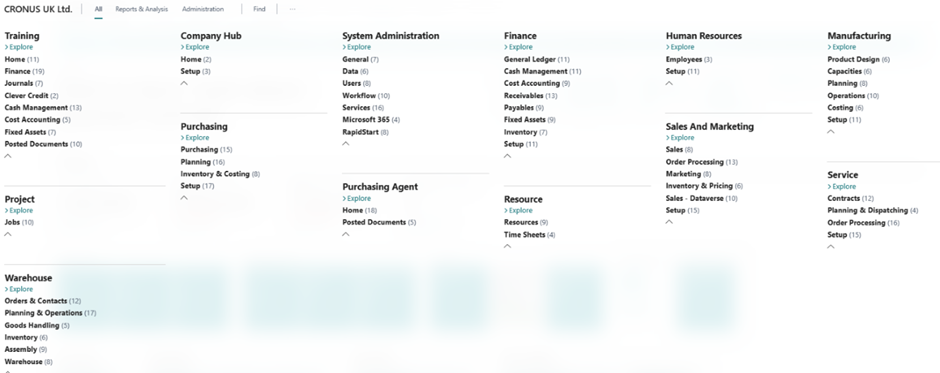
The Explorer lets you browse every functional area available in Business Central. To open it, select the Explorer icon in the navigation bar.
The first screen shows all areas you can access based on your current role and permissions. Select Explore More Roles to see the full capabilities of Business Central across all roles. You can navigate to any section from here, as long as your permissions allow it.
Explorer is particularly useful when you are looking for a feature you do not use often and cannot remember where it lives.

This new screen will now show you everything that Dynamics 365 Business Central is capable of, and you can navigate to any of these sections as long as you have the right permissions.
Search Me (Tell Me)
The Search feature in Business Central is labelled “Tell Me What You Want to Do.” Open it by selecting the search icon in the app bar or pressing Alt+Q on your keyboard.
Search lets you:
- Go directly to a page, action, or report
- Find guidance on completing a specific task
- Discover additional apps and consulting services for Business Central

The “On Current Page” section within Search shows actions specific to the page you are currently on. For example, if you open a Sales Quote and search for “customer,” Search returns an option to open the customer card for the customer on that quote. This saves time when you need to act on related records without navigating away.

Page Types in Business Central
Business Central uses several different page types, each designed for a specific purpose. Understanding what each one does helps you work faster.
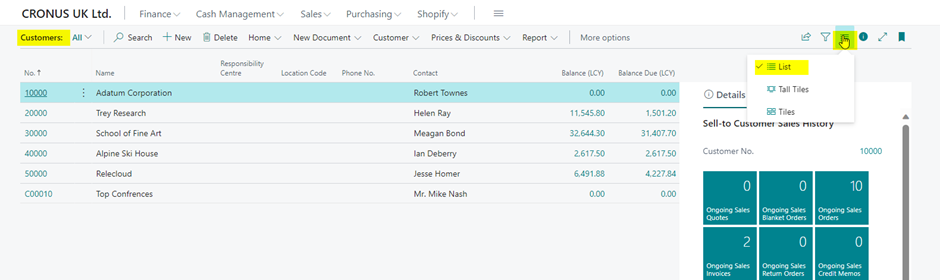
List Pages. These display a list of records, such as the Customer List or Vendor List. You can view, filter, sort, and manage records directly from a list page.
Card Pages. A card page shows detailed information about a single record. The Customer Card, for example, displays contact details, transaction history, and account settings for one specific customer.

Worksheet Pages. These are for data entry and editing. Sales Orders and Purchase Orders are worksheet pages. You create and update records directly on the page.


Document Pages: Document pages are used to view and manage specific business documents. For instance, an “Invoice” page allows you to view and manage individual invoices.
Register Pages: Register pages typically show transactions or events chronologically. Examples include the “General Journal” and “Item Ledger Entry” pages, which display financial transactions and inventory movements.


Statistics Pages: These pages provide statistical data and insights. For example, you might have a “Sales Analysis” page showing sales performance statistics.
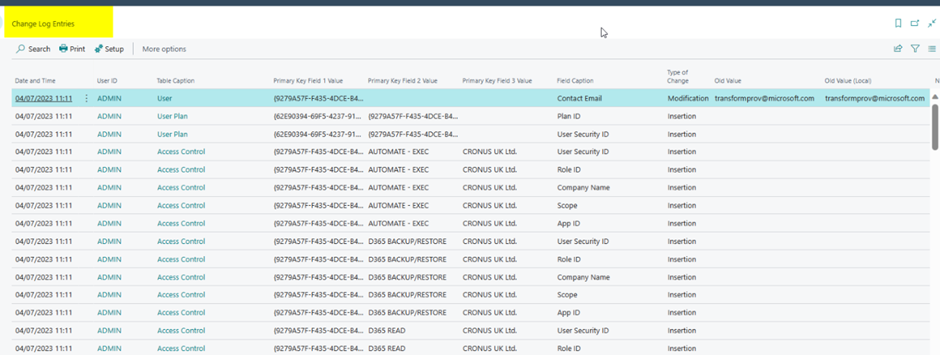
Change Log Entries.This page records every change made to tracked fields in the database. You specify which tables and fields Business Central should monitor, then activate the change log. Entries appear in chronological order and show exactly what changed, when, and who made the change.
Request Pages: These pages initiate specific actions or tasks, such as requesting approval for a document or launching a report.
Personalising Your Pages
Business Central lets you personalise individual pages to match the way you work. You can add, move, or remove fields on most pages without any technical knowledge.
Follow these steps to personalise a page:
Select the Settings icon in the navigation bar.

Choose Personalise from the menu that appears.

Select Add Fields to open the field selector panel.

Drag the fields you want from the panel onto the page and place them where you need them.
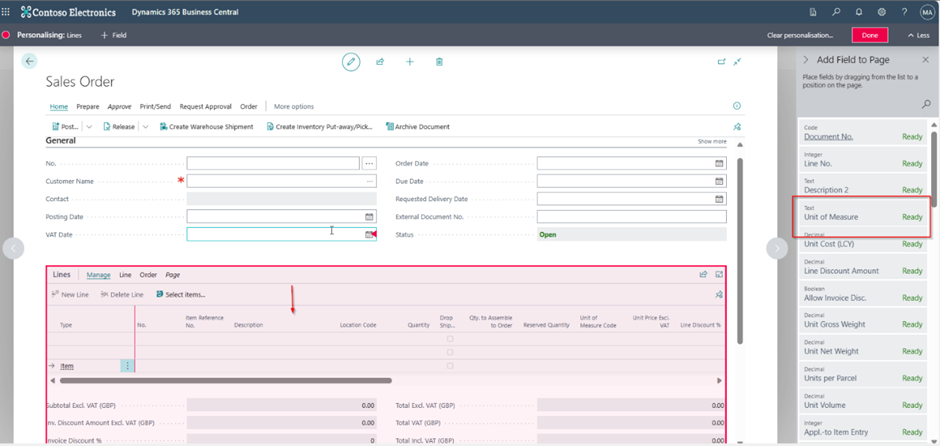
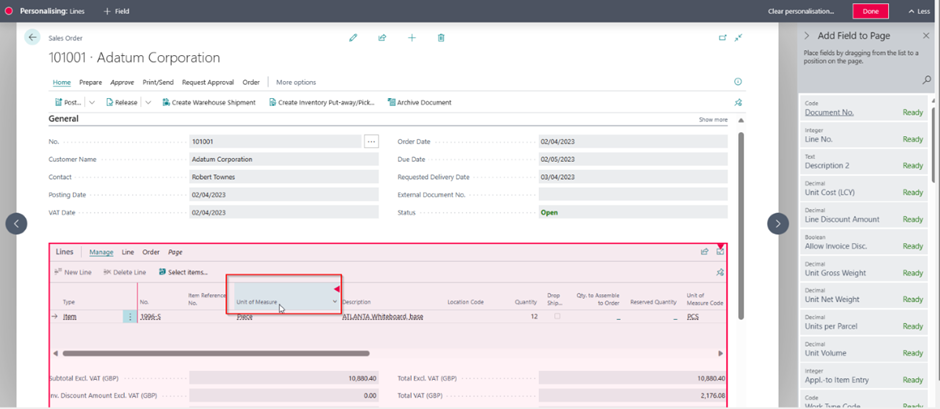
To move or remove an existing field, hover over it until the options icon appears, then select the action you want.


Select Done on the personalisation bar when you have finished.
You can personalise list pages, card pages, your Role Centre, and most other page types in the same way. Each change saves to your user account, so your personalised layout appears every time you log in.
Getting More from Business Central
Once you understand the core interface, start exploring further. Your Role Centre is a good place to begin. Review the navigation items your role gives you, and use Explorer to find areas you have not visited yet.
If you need help getting more from Business Central, the Tecvia team offers training, support, and implementation services. Visit ourDynamics 365 Business Central page or get in touch for a free consultation.