In this post, we’ll walk you through the key elements and features of this powerful business management tool’s interface. Whether you’re new to Dynamics 365 Business Central or looking to enhance your understanding, this post has you covered.

What Is Dynamics 365 Business Central User Interface?
Dynamics 365 Business Central’s user interface is a visual and interactive platform that allows users to interact with the software.
It’s designed to be user-friendly and intuitive, making it easy for businesses to navigate and utilise the system’s features.
The user interface in Dynamics 365 Business Central typically consists of a clean and organised layout, customisable dashboards, and user-friendly navigation. It’s all about providing a seamless experience that helps businesses manage their operations efficiently.
So, whether you’re accessing financial data, inventory management, or sales information, Dynamics 365 Business Central’s user interface makes your life easier. How efficient!

Benefits of Dynamics 365 Business Central’s User Interface
The user interface in Dynamics 365 Business Central offers several benefits that enhance the overall user experience and productivity.
Here are a few key advantages:
1. User-Friendly and Intuitive: Dynamics 365 Business Central’s user-friendly navigation makes navigating its various modules and features a breeze. The interface provides intuitive menus, ribbons, and search functionalities that enable users to find what they need quickly. With just a few clicks or keystrokes, users can effortlessly move between different areas of the system, ensuring a smooth and efficient workflow.
2. Clean and Organised Layout: Dynamics 365 Business Central’s user interface greets users with a clean and organised layout, ensuring a clutter-free workspace. The design focuses on simplicity, allowing users to easily locate and access the information they need. Clear labels, icons, and intuitive placement of elements create a visually appealing and user-friendly environment.
3. Customisable Pages: Dynamics 365 Business Central allows users to customise their dashboards and pages, tailoring them to their specific needs and preferences. This allows users to quickly access the most relevant information and functions, further enhancing productivity.
4. Streamlined Processes: The user interface in Dynamics 365 Business Central acts as a centralised platform that brings together different aspects of a business, including finance, sales, inventory, and more. This integration allows for seamless communication and collaboration between departments, eliminating the need for duplicate data entry and reducing the risk of errors. With all the necessary information readily available in one place, employees can easily access and update data, track progress, and make informed decisions. This streamlined approach improves efficiency and enhances productivity by eliminating redundant tasks and optimising workflows. The user-friendly interface simplifies the management of various processes, making Dynamics 365 Business Central a valuable tool for businesses of all sizes.
Overall, Dynamics 365 Business Central’s user interface offers a range of benefits that make it easier for users to navigate, access information, and perform tasks. It ultimately helps businesses optimise their operations and make informed decisions.
THE APP BAR
The app bar is at the top of your Dynamics 365 Business Central page. This is where you’ll access various elements crucial for navigating the system. It provides quick access to various Microsoft 365 apps and services, allowing you to easily switch between tasks without leaving Dynamics 365 Business Central.
You can check your email, create documents, and access files from OneDrive with just a few clicks.
This integration enhances productivity by keeping everything within reach.
The app bar is a handy tool for staying focused and efficient in your Dynamics 365 Business Central journey.
From here, you can easily switch between different modules, access your notifications, and find help and support resources.


You can personalise the app bar by selecting SETTINGS and VIEW ALL under the Microsoft 365 section, where you can select your preferred theme.
MY SETTINGS
You can observe and modify fundamental configurations for Dynamics 365 Business Central on the “My Settings” page.
It’s important to note that any adjustments you make will solely impact your personal workspace and will not affect the workspaces of other Dynamics 365 Business Central users.

You can change the Role Centre, Company, Work Date, Region, Language, Time Zone, Notifications, and Cloud Storage fields on the My Settings page.
ROLE CENTRE
Dynamics 365 Business Central offers role-based centres that provide a tailored experience for different users. These centres display relevant information and tasks based on your organisational role. Whether in finance, sales, or inventory management, you’ll have a personalised dashboard to streamline your daily activities.
Role Centres in Dynamics 365 Business Central are like personalised hubs that streamline the user experience. They concisely present relevant data and actions and tailor them to help users make informed decisions and work more efficiently. By adopting a role-based approach, Dynamics 365 Business Central ensures users have quick access to the information they need, reducing the time spent searching and navigating the system. This not only improves productivity but also boosts user satisfaction. With Role Centres, users can stay focused on what matters most without getting lost in the sea of information. It’s all about working smarter, not harder! 🚀💼
The role centre page is divided into two main areas: navigation/actions area and content area.
The following figure illustrates a Role Centre page’s general layout and elements.

– Navigation menus – The top-level navigation should provide access to relevant entity lists for the role’s business areas. For example, typical root items for a business manager could be finance and sales, and purchasing. You should place the root items in order of importance, starting from the left.
EXPLORER
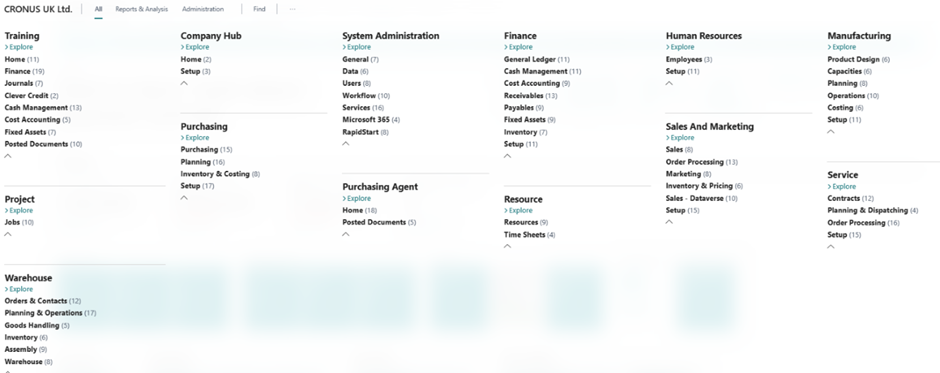
Using Dynamics 365 Business Central, the Explorer can be used to locate all functional areas of the system. It starts by pressing the icon below.

First, you will enter a screen with a full view of the areas you can access as part of the role that has been assigned to you.
Next, you will see a new screen if you press Explore More Roles.

This new screen will now show you everything that Dynamics 365 Business Central is capable of, and you can navigate to any of these sections as long as you have the right permissions.
SEARCH (TELL ME)
In Microsoft Dynamics 365 Dynamics 365 Business Central, the “Tell Me What You Want To Do” feature is a search and assistance tool that helps users quickly find and access various functions, features, and information within the software.

Search can help you quickly go to elements such as actions, pages, or reports, find information about completing a particular task, and discover additional apps and consulting services for Dynamics 365 Business Central. When you need help finding something, use the search icon to search for it. You can also use ALT+Q on your keyboard to start using search.
The “On Current Page” section lets you discover and execute actions specifically on the currently open page. For instance, when you open the Sales Quote page and input the term “customer,” this section presents an option to access the customer card for the customer selected within the sales quote.

PAGES
There are several different page types within Dynamics 365 Business Central. We have listed them below.
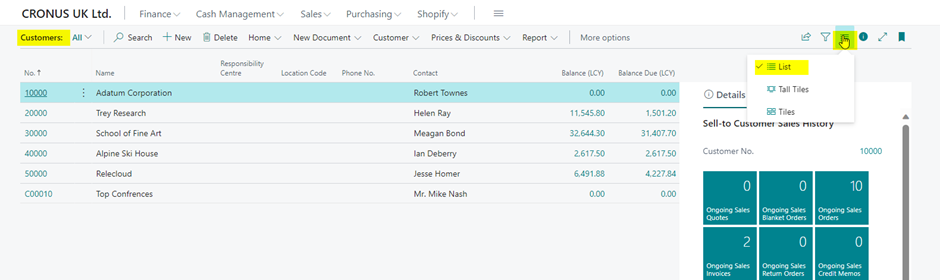
List Pages: These pages display lists of records. For example, the “Customer List” and “Vendor List” pages show a list of customers and vendors, respectively. You can view, filter, and manage records from these pages.
Card Pages: Card pages provide detailed information about a single record. For instance, the “Customer Card” page displays comprehensive details about a specific customer, including contact information, transaction history, and other relevant data.

Worksheet Pages: These pages are used for data entry and editing. Examples include the “Sales Order” and “Purchase Order” pages, where you can create and edit sales and purchase orders.


Document Pages: Document pages are used to view and manage specific business documents. For instance, an “Invoice” page allows you to view and manage individual invoices.
Register Pages: Register pages typically show transactions or events chronologically. Examples include the “General Journal” and “Item Ledger Entry” pages, which display financial transactions and inventory movements.


Statistics Pages: These pages provide statistical data and insights. For example, you might have a “Sales Analysis” page showing sales performance statistics.
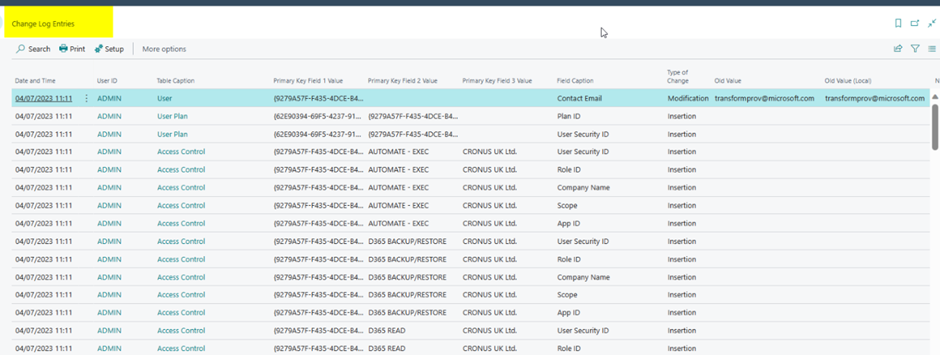
Change Log Entries page: On the Change Log Entries page, entries are chronologically ordered and show all changes made to the values in fields on the tables you specify. The change log lets you track all direct modifications a user makes to data in the database. You specify each table and field you want the system to log and then activate the change log. The change log is based on changes made to data in the tables you track.
Request Pages: These pages initiate specific actions or tasks, such as requesting approval for a document or launching a report.
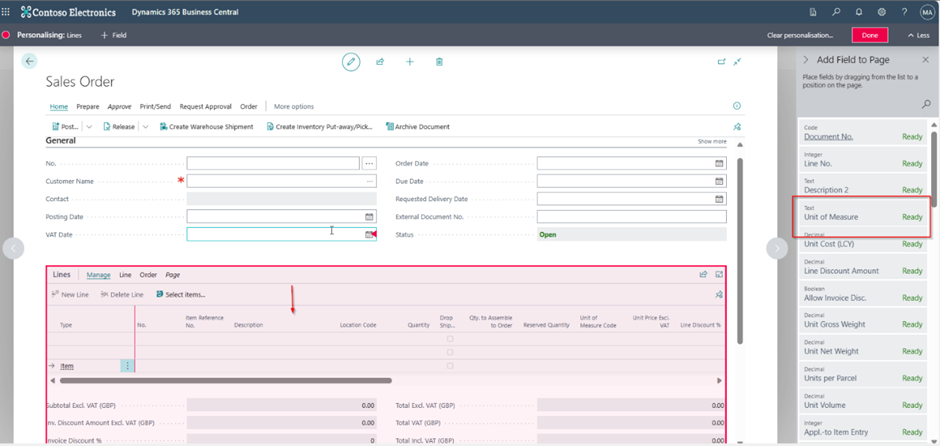
PERSONALISATION
It’s possible to personalise screens to your specific needs.
Step 1: Click on the setting icon in the navigation bar of Dynamics 365 Business Central.
After clicking a dialogue box will appear from there, select personalise optio.n

Step 2: – Personalisation mode will appear below in the image.

Step 3: Now click on the add fields option. A dialogue box titled “Add field to page ” will appear, from which you can find the fields you can add to our page.

Step 4: To add the fields, you just need to drag them from the dialog box and place them on the page where you want them.
Example: – Assume I want the “Unit of Measure” field after the “Description” field. So, I will drag that field and place it after the description.
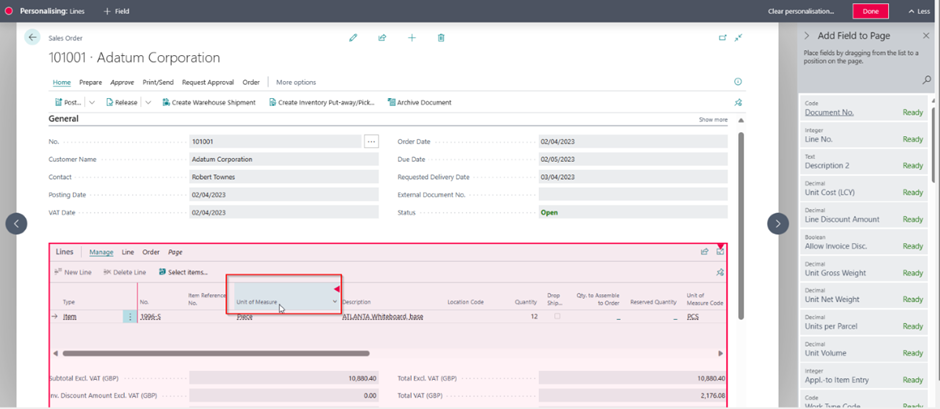
As we can see, the “Unit of Measure” field is displayed now after “Description.”
From personalisation, we can also move and remove the fields that are not required in our sandbox environment.
To do so, we just need to hover over the fields, and an arrow-type icon will appear. We need to click on that, and then a small dialogue box will appear with the available options.


After making all the changes, click on the done icon, which is present on the personalisation line.
Similarly, you can personalise different pages, such as the card page, list page, role centre, etc.
If you’d like to learn more about Dynamics 365 Business Central, check out our page here, or if you’re interested in learning more, contact us.
This is only possible when logging into Dynamics 365 Business Central. For more information, check out our other blog post on how to Log in to Dynamics 365 Business Central.
Stay tuned for more insights and updates on our blog!